Introduction
Feather accessories have an unmistakable visual impact. Whether it’s a dramatic feather fan, a soft boa, or a finely crafted statement piece, feathers bring movement, texture, and rich color into a frame in a way few materials can. Yet that same beauty makes them challenging to photograph. Feathers react instantly to light, air, and camera settings, and small technical mistakes can flatten texture, mute color, or make movement feel accidental rather than intentional.
This guide is designed for photographers, stylists, and brands working with feather accessories, especially for product and editorial shoots inspired by the elegance and craftsmanship showcased at fancyfeather.com. You’ll learn proven feather photography tips for revealing fine texture, capturing controlled motion, and preserving accurate, luxurious color. From lighting and camera settings to styling and post-processing, each section offers practical advice you can apply immediately to elevate your feather imagery.
Understanding Feather Anatomy for Better Photos
To photograph feathers well, you must first understand what you’re photographing. A feather is not a flat surface. It is a layered structure made up of a central shaft, branching barbs, and microscopic barbules that interlock to form a soft yet structured surface. These tiny components are what give feathers their signature texture and depth, but they only become visible when lit and focused correctly.
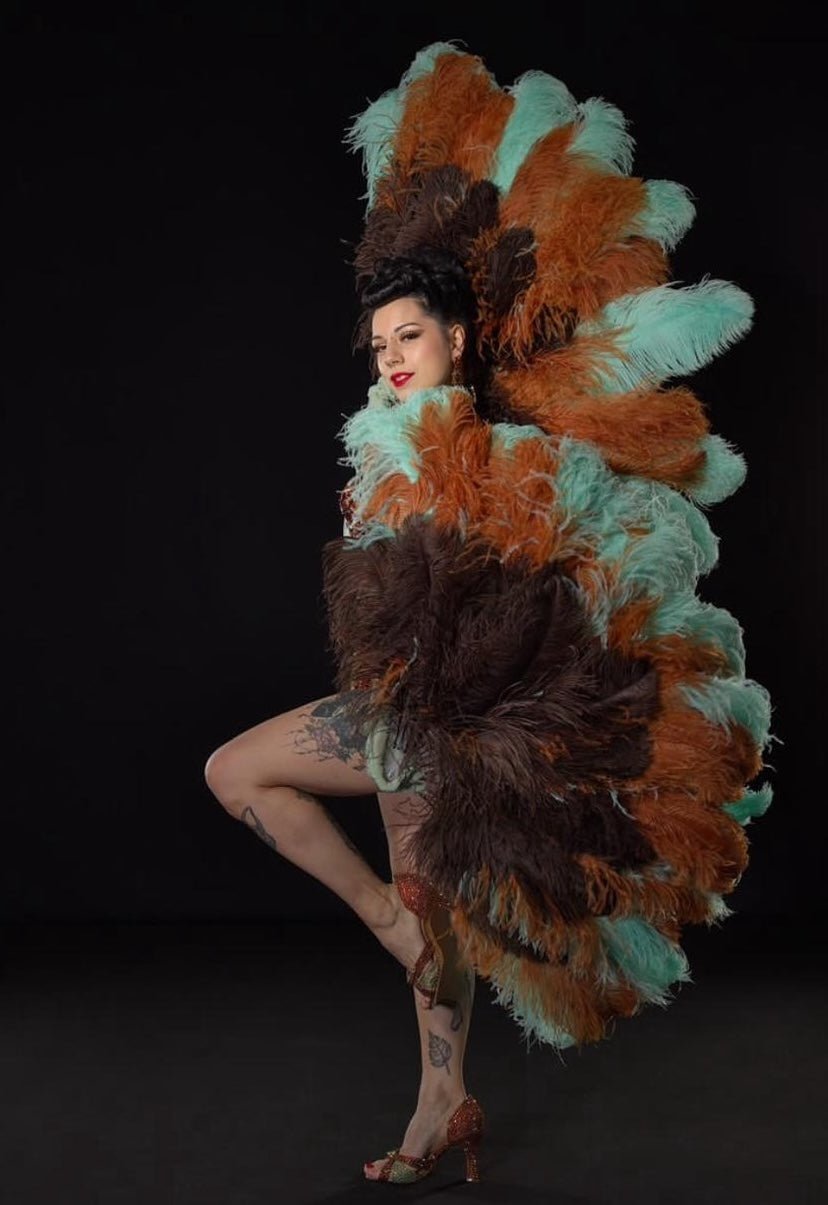
Feathers also interact with light in unique ways. Many reflect light unevenly, producing soft highlights along the edges while remaining matte in the center. Some feathers appear translucent when backlit, while others display subtle iridescence that shifts color depending on the viewing angle. This is especially important when shooting feather fans or boas, where multiple layers overlap and create visual density.
Understanding this anatomy allows you to make informed decisions about lighting direction, aperture, and composition. For example, side lighting emphasizes the micro-shadows between barbs, enhancing texture, while flat front lighting can make even premium feathers look lifeless. When you approach feather photography with this structural awareness, every technical choice becomes more intentional.
Gear Essentials for Feather Photography
Camera and Lens Choices
High-resolution cameras with strong dynamic range are ideal for feather photography because they preserve fine detail and subtle color transitions. Feather textures benefit from clarity, so shooting with a camera that performs well at low ISO settings is essential.
A macro lens is one of the most valuable tools you can own for this genre. It allows you to focus closely on individual strands, revealing detail that the eye often misses. For wider product shots, a standard prime lens with excellent sharpness works well, especially when you want to balance detail with elegance.
Stability and Support Equipment
Feather photography rewards precision. A tripod ensures consistency when shooting at smaller apertures or slower shutter speeds, particularly for macro work. Even slight camera movement can soften fine details, so stability is non-negotiable when aiming for professional results.
Reflectors and diffusers are equally important. They give you control over contrast, allowing you to soften harsh shadows or gently fill in darker areas without overpowering the natural texture of the feather.
Practical Application
When shooting a feather fan for a product page, combining a macro lens with a tripod and a diffuser allows you to capture crisp texture while maintaining a refined, luxury aesthetic that aligns with premium feather accessories.
Lighting Techniques to Reveal Texture
Side Lighting for Maximum Texture
Side lighting is one of the most effective feather photography tips for enhancing texture. When light hits the feather from an angle, it creates tiny shadows between the barbs, making the surface appear rich and three-dimensional. This technique is especially useful for boa texture photography, where softness and volume need to be visually apparent.
Backlighting for Translucence
Backlighting feathers can produce a luminous effect, revealing delicate structures that are otherwise invisible. This works beautifully for lighter feathers and layered accessories, adding an ethereal quality that suits editorial imagery.
Diffused Versus Direct Light
Soft, diffused light is ideal for most feather accessory shoots because it prevents harsh highlights and preserves natural color. However, controlled direct light can be used creatively to accentuate texture or create dramatic contrast, particularly in fashion-forward editorials.
Creative Lighting Control
Using controlled light sources allows you to sculpt the feather’s appearance. Subtle adjustments in angle or intensity can dramatically change how texture and color are perceived. The key is to experiment while maintaining consistency, especially for product photography where uniformity matters.
Camera Settings for Feather Photos
Aperture choice plays a major role in feather photography. Smaller apertures increase depth of field, making more of the feather sharp, which is ideal for detailed product shots. Wider apertures isolate specific areas, drawing attention to curves or edges in more artistic compositions.
Shutter speed depends on whether you want to freeze motion or introduce blur. Fast shutter speeds are best for crisp, static shots, while slower speeds allow controlled motion when shooting feather fans in movement.
ISO should be kept as low as possible to preserve detail and color fidelity. Noise can obscure fine texture and reduce the luxurious feel of the image. Manual focus is often more reliable than autofocus for macro shots, giving you precise control over where sharpness falls.
For example, when shooting a feather boa laid out on a surface, using a moderate aperture with manual focus ensures the texture remains consistent across the frame without sacrificing softness.
Macro Feather Photography Tips
Filling the Frame with Detail
Macro photography allows you to transform a small section of a feather into a compelling visual story. By filling the frame, you eliminate distractions and highlight repeating patterns that emphasize craftsmanship and quality.
Managing Depth of Field
At close distances, depth of field becomes extremely shallow. Adjusting aperture carefully ensures enough of the feather remains in focus without flattening the image. This balance is crucial for showcasing texture without losing visual depth.
Stability and Precision
Macro work demands stability. A tripod combined with careful focusing techniques ensures the feather’s finest details are rendered sharply. Even breathing can affect focus at high magnifications, so patience is essential.
These macro techniques are particularly effective for detail images used alongside main product shots on fancyfeather.com, adding depth and credibility to the visual presentation.
Capturing Motion: Movement and Blur Effects
Feathers are naturally associated with movement, and capturing that motion can add life to your images. Controlled motion blur is a powerful creative tool when used intentionally. Slower shutter speeds allow feather tips to blur while the base remains sharp, creating a sense of flow.
Panning techniques can also be effective when photographing a moving feather fan. By matching the camera’s movement to the subject, you retain clarity while introducing dynamic background blur.
The key is control. Motion should enhance the image, not distract from it. Testing different shutter speeds helps you find the balance between energy and elegance.
Color Fidelity and Enhancing Hues
Accurate color reproduction is critical in feather accessory photography. Buyers and editors expect colors to match reality, especially for premium products. Proper white balance ensures that whites remain neutral and colors remain true.
Background choice plays a significant role in color perception. Neutral backgrounds allow feather hues to stand out, while complementary tones can enhance warmth or richness without overpowering the subject.
In post-processing, subtle adjustments to vibrance are often more effective than heavy saturation. The goal is to enhance natural beauty, not create artificial intensity. This approach aligns with the refined aesthetic expected from high-end feather accessories.
Styling Feather Accessories for Different Shoots
Product Photography Styling
For product shoots, simplicity is key. Clean compositions, minimal props, and consistent lighting ensure the feather accessory remains the focal point. Every styling choice should support clarity and texture.
Editorial and Fashion Styling
Editorial shoots allow more creative freedom. Movement, layered styling, and expressive lighting can be used to tell a story. Feathers can interact with fabric, air, or motion to create drama while still showcasing quality.
Contextual Considerations
Understanding the intended use of the image helps guide styling decisions. Product pages require clarity and consistency, while editorial features benefit from mood and narrative. Tailoring your approach ensures your images serve their purpose effectively.
Composition and Framing Strategies
Composition directs the viewer’s eye. Filling the frame emphasizes texture, while negative space creates elegance and balance. The rule of thirds can help position feather curves or focal points in visually pleasing ways.
Changing angles can dramatically alter perception. Shooting from above highlights patterns, while lower angles emphasize volume and flow. Exploring multiple perspectives ensures you capture the feather accessory at its best.
These composition strategies are essential feather photography tips for creating images that feel intentional and refined rather than accidental.
Post-Processing Best Practices
Post-processing should enhance, not replace, good photography. Selective sharpening brings out texture without introducing noise, while gentle noise reduction preserves softness.
Cleaning up minor distractions, such as stray fibers or dust, helps maintain a polished look. Color adjustments should remain subtle, ensuring consistency across a product collection.
A thoughtful editing workflow ensures your final images reflect the quality and craftsmanship of the feather accessories themselves, reinforcing trust and professionalism.
Conclusion
Feather accessory photography is a balance of technical precision and creative sensitivity. By understanding feather anatomy, mastering lighting, controlling motion, and preserving color fidelity, you can create images that capture texture, movement, and elegance with confidence.
These feather photography tips are designed to help you elevate both product and editorial shoots, ensuring feather fans, boas, and accessories are represented at their highest potential. When applied consistently, these techniques create visuals that feel luxurious, intentional, and perfectly aligned with the refined aesthetic showcased at fancyfeather.com.
Share:
Feather Boas and Fans in Cultural Festivals Worldwide, Beyond Carnival and Burlesque
Feather Accessories for Men: Breaking Gender Norms in Fashion and Performance